I got into an excellent discussion elsewhere on how alternators work with multiple battery banks and isolators. It’s not completely complicated, but it takes a lot of words to try and explain and make sense. After scouring the internet for good illustrations and finding none, I ended up whipping up my own, and wanted to clean up my response afterward, expand on it, and make it a little easier to read.
The very silly TL;DR summary with multiple battery banks at different states of charge is that your auto electrical system is very socialist. “From each (alternator) according to his ability, to each (battery) according to his needs.” This is true with small tweaks whether your isolator is a relay or a diode, too.
What exactly happens when one alternator charges two batteries?
In a situation where you have an auxiliary battery connected to your starting battery with an isolator in between, how does the alternator’s regulator react? Lets assume the starting battery is at full charge (12.7v) and the aux battery is at half charge(12.0v)
From my understanding, the regulator would see a voltage of something in between the two, say 12.3v and continue to put a high voltage instead of trickle charging it to prevent damage.
Is my understanding completely off?
…
Lets say the starting battery is 95% and the house battery is 50%. In order for the current to get to the house battery, it would have to pass through the starting battery. And since the starting battery is still a lower capacity than the alternator gives, how does it not take in anything?
This question actually came up because I left the car heater vent on the lowest setting for days and didn’t realize it. Usually the dashboard shows the charging needle slightly tipped towards ‘Charge’ when I’m driving. This time, with the starting battery half drained, it was outputting much more current. What I noticed was, it also charged my house battery much faster too.
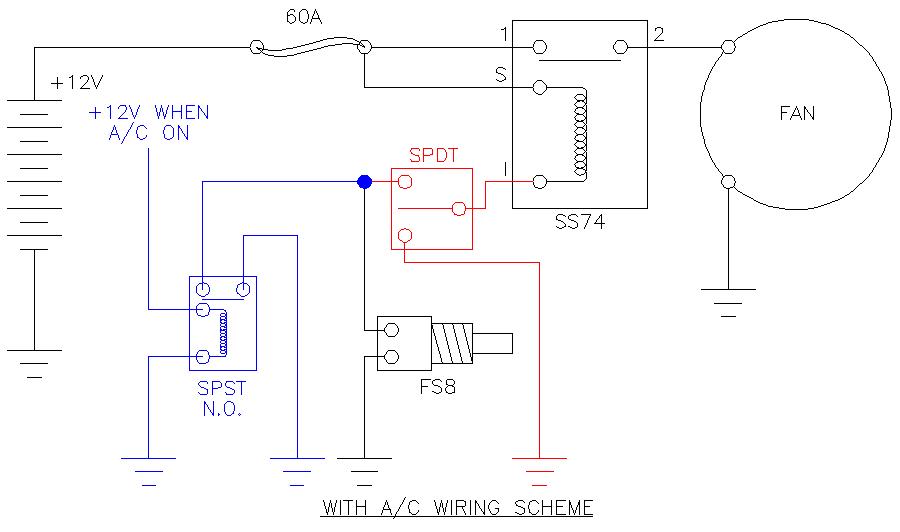
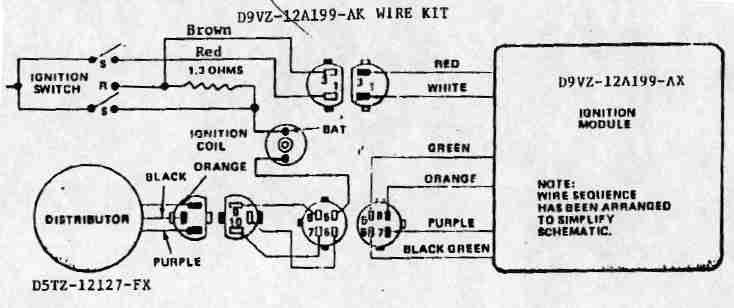
After a little discussion, I got a bit more good information from the original poster. He has an 88 Econoline with a factory battery isolation relay and alternator, so I was able to cook up illustrations that were at least reasonably specific to a particular vehicle.
I had originally wanted to grab a couple of illustrations to make it make a little more sense, but after scouring the internet to see if anyone already had the right illustrations up, no one did. No wonder nobody usually understands how this stuff works. You can find illustrations all day of battery voltage during charge or discharge, but I never did find a chart of voltage (at a specific level of charge) as it changes depending on how much current you’re putting in or pulling out right at that moment, which is what you need to understand this.
I did enough hunting to make sure my information is right, and just did up my own illustrations after work one evening.
How does each piece of the system work on its own?
Before any of this makes sense, you need to be able to see how each piece acts under different electrical loads, but there are a lot of variables that change things. These illustrations aren’t *accurate* per say to any particular setup, but they’re “about right” for the stock 2G alternator and starting battery you get in an E-150 from around 1987-1994 or so, and hopefully just good enough to explain the concept.
Alternator
Most of the graphs for those show the max output current you can get depending on the alternator or engine speed, which doesn’t really help us much. What you really need to see is what your alternator will do at a fixed cruising speed as you increase the load on it.
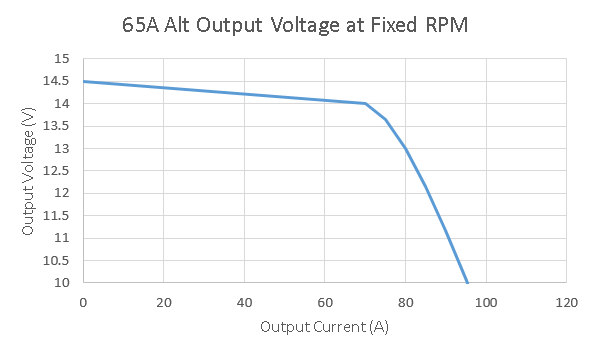
At cruising speed, you can see the voltage output of your alternator is mostly flat up to somewhere around its rated output, and somewhere after that, as you put more load on it, the voltage it’s able to put out drops. For the flat part of the graph, the voltage regulator is cranking the field up in the alternator to keep the voltage up. Once the field is at full strength, that’s all you have, and the voltage drops quickly after that as you increase the demand for current.
This does change as your engine speed changes. At idle, with the anternator only turning about 2,000 RPM (usually about 3x crank speed), the cutoff point moves a lot farther to the left. At cruise, most Fords will have the alternator turning anywhere from 4,000-6,000 RPM, and this is probably pretty representative of that. If you’re running the engine faster, it does push the cutoff further to the right, but not by as much; you get to a point where all the resistance in the components basically wins out over spinning the alternator faster. Most Ford alternators are good for around 16,000-18,000 RPM before things start breaking.
This curve isn’t accurate or based on real test data, because unfortunately I don’t have any and couldn’t find any. This one’s based on information for separately excited alternators available in engineering texts, and modified with adding in the behavior appropriate for having a voltage regulator. So yes, I’m sure this is what the curve looks like, but at the same time, no, I’m not confident of a single exact number on this graph, since I’ve adjusted it by eyeball. Anyone want to get together and make an alternator test bench so we could get real numbers?
Starting Battery
Next up is what your starting battery does at different current levels.
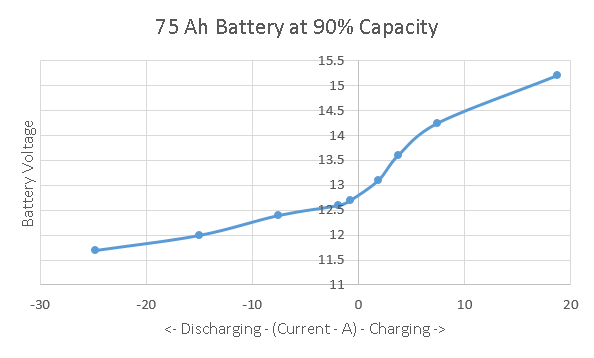
This was the hard part to find, and I ended up extracting this info from some really good battery charts put together by a boat guy for Home Power magazine. These battery graphs are actually at least based on someone’s experimental data, so they’re a little more accurate than the alternator graph I have above. To get this graph, I essentially took the chart on the last page of the linked document, and took the values at one “slice” at a specific state of charge (90% for this first curve), then adjusted for the battery size.
Everything on that curve above changes with both how big your battery is, and how discharged it is, so I’ve made one for each of the different situations we’d need to look at to understand how isolators and multiple battery banks work together. For this first one, it’s assuming about a 75Ah lead acid battery (basically the Group 65 battery in an Econoline).
As you look to the left of zero on the bottom, that’s discharge current, with your battery supplying power. To the right is charge current, with power being put into your battery. What you can read roughly off this chart is the voltage. This chart has about the right voltage numbers for your starting battery being 90% charged, which is pretty normal for just having fired up a van that’s sat for a little while.
The least accurate part of these charts is right around 0 current. Lead acid battery behavior is very “fuzzy” in this area, and the voltage depends on a lot of other things, so don’t pay much attention to the line that connects the lowest “charging” and “discharging” currents; it doesn’t mean a lot there.
The simplest system: One alternator, one starting battery
Low Load
Now, let’s look at the first and simplest combination, just your alternator and your starting battery. Right after you fire up your van, the alternator kicks right up to 14-14.5V or so. Your van’s fuel pump and electronics are taking maybe 30A to run, so your system will probably be at around 14.2V – you have to “guess” first to figure this out, and then go back and add things up to see if your guess was about right.
What’s important to see is that your battery and alternator are tied together, so they *have* to be at the same voltage. At 14.2V, your alternator can put out about 42A, and your battery “wants” about 7A worth of charge, so 14.2V would be right if the rest of your system is demanding about 35A right then. Pretty close, but maybe not quite a good a guess as we can do, because the currents don’t quite balance out – your car and battery want 37A together, and the alternator wants to put out 42A, so we’re off a little.
I can skip a step and say 14.3V works out too high, so let’s try halfway between at 14.25V. At that voltage, the start battery wants 7.5A, and the van still wants 30A to run, and the alternator wants to put out 35A. That’s pretty darned close – within a couple of amps – so I’d call 14.25 the answer. It’s probably a little bit too precise considering how rigged up the charts are.
Medium Load
Now with that simple one alternator/one battery combo, let’s crank on the headlights and turn the fan on low; now we’ll say we’ve raised our load from the van to 50A. Let’s guess 14.1V for the system voltage. Looking at the battery chart, the battery charge current is probably going to drop to more like 6.5A at that voltage, so your total load is now about 56.5A. Your alternator graph says it’s putting out about 56A at that voltage, so our guess was good! 56A coming out of the alternator will split into about 50A going to the van and 6A going to the battery.
High Load
Okay, time to overload the alternator. Crank the heat on max (those blowers draw about 20A on max), turn on the rear air, and maybe heated seats. Flip on the wipers, get everything going. Now we’ve got about 90A of demand in the system. That’s way more than the alternator can put out by itself at above 12V, so if you trust the slightly fictional chart I made, your alternator can only put out about 11.5V at that load.
Battery to the rescue! It’s still connected, and if it were actually at 11.5V, it would really be putting out some juice! What’s really going to happen is that the system is going to settle at whatever voltage the output current from the battery and the alternator add up to 90A.
Looking at the chart, that looks like about 12.4V to me. At 12.4V, your alternator can still crank out 83A, and your battery is going to put out the remaining 7A.
The Simple System TL;DR
I picked the simple situation first because this one has to make sense before you can understand what happens when you throw in a second battery bank with a different charge. In this simple example you already have two things that can put out power (alternator and battery) that have to “decide” how to share the load. The thing is, it’s not really so much a “decision.” Each thing has it’s own natural behavior that the chart tries to make sense of, and the system has one “natural law”, which is that the voltage for all the pieces we’re looking at will always be the same (because they’re directly connected). Hence, the alternator and battery will increase or decrease output until the voltage stabilizes between them. It’s a bit of a physics balancing act.
Adding an AUX/House Battery Bank
Low vehicle load, 50% Aux battery charge
Now, let’s go back to the first example where you’ve just started the van and have a reasonable 30A system load, but now we add in your house batteries. Let’s say your battery bank is 200Ah, equivalent to almost three of those starting batteries in size – I want to exaggerate things a little so it’s easier to see the effect in the different charts. Your battery bank is only 50% charged when your isolator relay connects it to the alternator and starting battery, so its chart looks like this.
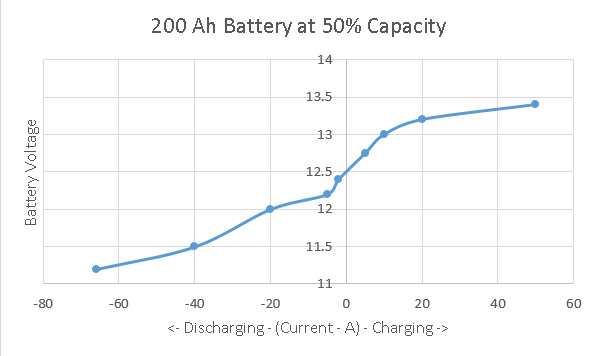
The shape is really similar, but the currents are much bigger (because the bank is bigger) and the voltages are lower (because the bank is half discharged). Your van’s system still wants about 30A to run its own stuff.
So now, with that isolator relay connected, the “all the voltages are the same” law applies to all three pieces. To figure out what it’s going to do, I have to guess a voltage again to start. I can make an educated guess and say maybe the system will run at 13.5V, which looks pretty close. Let’s see, at 13.5V our alternator puts out about 76A, and our demand is 30A (from the car’s electronics) plus about 3A (what the mostly charged small battery wants at that voltage) and a whopping 65A that our hungry battery bank wants at that voltage. That’s a total load of 98A, way more than the alternator is putting out, so I’ve obviously guessed wrong!
If I try again it comes out closer – At 13.4V, the load is 30A car, still about 3A starting battery (too small a change to tell from the chart), but down to about 40A on the battery bank. The alternator can put out just a few more amps, too. So the load goes down to 73A, and the alternator’s capacity creeps up to maybe 77. Basically, we’re about there; 13.4V is about as accurate as we can get with these charts.
With that example, you can really see how the power gets split between the two battery banks. Your starting battery doesn’t want much; it’s too full to take much more charge at that low of a voltage, and the voltage is still too high for it to discharge at all. Meanwhile, your aux battery bank is hungry, and it’s just going to suck current in until it drops the alternator’s voltage down to a level where it’s being satisfied. As the current goes up, the alternator’s voltage drops, and as the voltage drops, the aux battery’s “hunger” drops, so they meet in the middle.
Low vehicle load, 50% Aux battery charge
Now, to see what was going on with your rig the other day when your aux bank was really down, here’s a curve for your aux battery at only 20% charge.
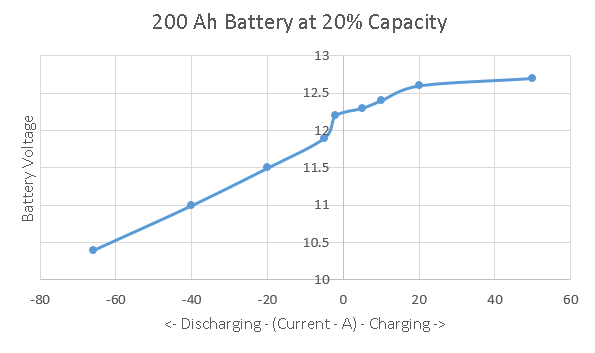
This is enough of a difference to start to suck juice out of your starting battery, just like you saw, though not much at all yet.
I’m going to guess 12.7V first. At 12.7V, your alternator is putting out about 82A, your start battery is actually putting out about 1A. Your van still wants 30A to run, and your aux battery wants to suck up a full 50A! That’s probably a pretty good guess on the voltage, we’re within a couple of amps of everything adding up. 83A or so from the alternator and start battery, and 50 of it going into recharging the auxiliary bank.
You can see where even small changes in my guesses on making those graphs would make it draw harder from your starting battery.
- If your aux was less than 20% charge left, you’d definitely pull a lot harder from the starting battery, since your alternator is completely maxed out.
- My “alternator curve” could easily have been generous for that alternator over 70A, too, since I just cooked up that part of the curve “by eye” until it looked right. Unlike the batteries, I don’t have good hard data for that one, just enough basic knowledge of how it works to cook up a chart.
- The smallest increase in load from the van itself is going to come almost straight out of your starting battery now, with house battery charge current decreasing. The alternator is almost completely maxed out, so if you turn out the heaters for 10A (for 40A total for the van), the voltage drops a tiny bit to 12.68V, your alternator still produces about 82A, the starting battery puts out about 2A, and your aux charge current drops to only 44A (for an 84A total load). Doesn’t sound like much, but the ammeters in the Ford dashes are actually really sensitive, and you’d definitely see that as a very noticeable needle twitch.
On the other hand, this goes to show why you shouldn’t worry too much about a relay isolator causing your aux batteries to “drain” your start battery when the car is running. You have to really drain down your house batteries before they even start pulling any current out of your start batteries, and even then, it’s a tiny trickle.
At the same time, you can see how recharging the house batteries from a really low charge really works the snot out of the alternator. Not a good part to cheap out on.
What about a diode isolator?
A diode isolator does change things, and not always in a good way. It does guarantee that your house bank won’t pull charge directly from your starting bank when you’re running. However, as you can see from the examples above, that’s not really a big risk even with a simple relay.
What a diode isolator definitely does is change the shape of the alternator curve. Diodes have what is called a “forward voltage drop” when they’re working. This is basically a fixed voltage loss whenever current is flowing. I understand for most alternator diodes this is about 0.9V.
To compensate for this, the “voltage sensing” wire for your voltage regulator is still attached at the starting battery, on the downstream side of the diode (do not attach on the aux battery side instead). If your regulator wants 14.2V, it’s going to crank the field on the alternator higher, until the alternator is putting out 15.1V. This will produce 14.2V on the downstream side of that diode.
This affects alternator performance three ways:
- It adds load to the alternator. If you’re producing 50A, you are losing 45W crossing the diode, so that’s another 45W the alternator has to put out. This means your alternator will always run a little hotter.
- It reduces the alternator output where the regulator maxes out. Because it’s taking extra field strength to supply the extra 0.9V, your regulator will run out of the ability to add extra “kick” at a lower output current, so you “fall off” the flat part of the curve earlier.
- You lose voltage everywhere above that flat spot for a given current, so your charge performance when the alternator is maxed out decreases very measurably.
I’ve made another rigged up chart that shows this behavior. The overall curve isn’t the most accurate, but the difference in performance is pretty on-the-mark.
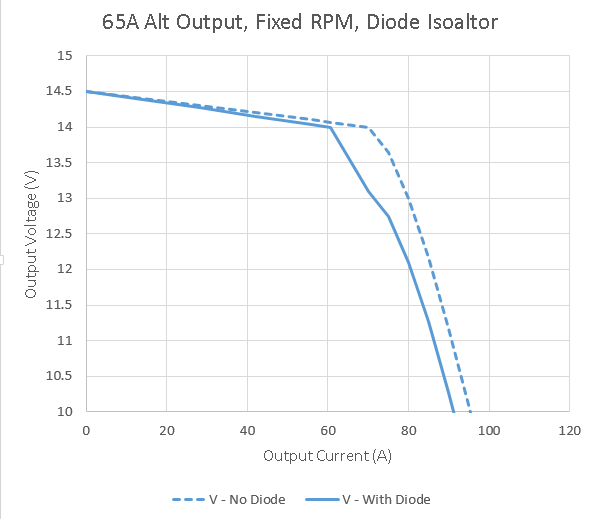
The original alternator curve is dotted. I’ve stretched the graph a little taller to make the differences easier to see. It’s a little squiggly from 14 to 13V, but overall it’s about right.
As you can see, there’s not much difference when you’ve got a low load. However, once you’ve maxed out your field, whoa! What a difference. The alternator that was rated at 67A would probably be rated at about 58A now if you used the same criteria. You lose almost 5A all the way through the range. All your lost power is going into the 50W+ or so that your diode is eating.
This is why I like isolator relays. Even at the very high currents you get recharging a 200Ah bank that’s drained way down, I can get a continuous duty solenoid that will handle the current for $40 tops. I’d much rather spend the extra money you’d pay for a diode isolator (about $35 extra minimum for this alternator size) toward a much better alternator instead.
So what’s really going on here?
Nothing in the system really knows how to distribute the electricity, each piece just has it’s own performance characteristics, and the system will “balance out” naturally to whatever voltage makes the available supply (from the alternator) meet the demand (from the car electronics, and the two battery banks).
Plus, diode isolators are the devil! (Your mileage may vary)